

Populating the players table:
1 Once per month the ACBL sends webmaster@NEBridge.org one or more files. This email usually arrives on the 6th or 7th. If it has not been received by the 10th, the ACBL should be contacted. The arrival of the file(s) indicates that the ACBL's monthly update of its roster is complete. The process of downloading the database should be done as soon thereafter as possible.
1.1 Before beginning, back up the following tables: players and players_date_points. The data should be backed up on both the local system and the remote system. The procedure for backing up tables is documented here. The two tables are shown in blue on screen #BDB071A.
1.2 Sign on to your My ACBL account. If you do not have one, go to ACBL.org and click on the "MyACBL" button at the top of the screen. Follow the instructions for creating an account.
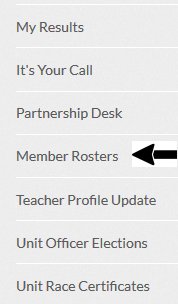
1.3 Click on “Member Rosters” in the list of options on the left. If that option does not appear, contact the District Director or the President. One of them should be able to get you access.
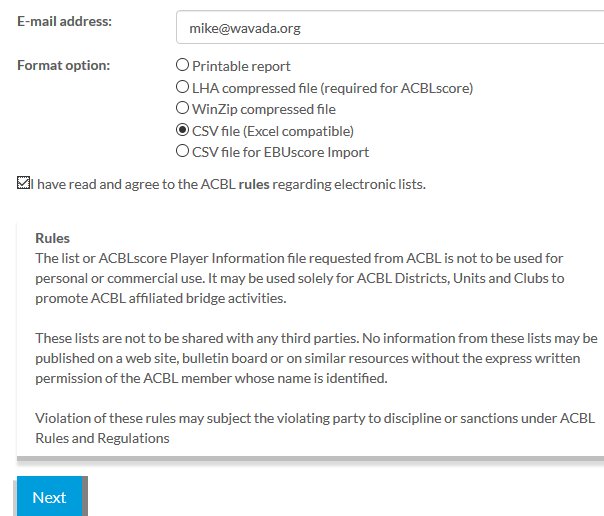
1.4 On the “General Information” screen make sure that the email address is correct. Then select “CSV file (Excel compatible)” and check the box that indicates that you have read the rules. Click on “Next.”
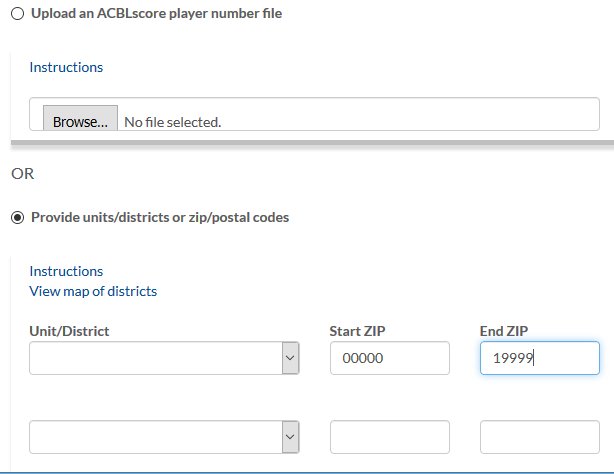
1.5 In the columns marked “Start ZIP” and “End ZIP” enter the starting and ending zip codes. It will probably be necessary to make more than one selection, but they must be done on different passes (specifications on the “General Information” screen). If you try to select more than one set at the same time, it will combine all records that were selected into one file. So, it is a mistake to fill in more than one line on this screen. Six sets of files seemed to work pretty well. For some reason the starting and ending values must have the same number of characters:
1.5.1 Pass #1: 00000 to 19999
1.5.2 Pass #2: 20000 to 39999
1.5.3 Pass #3: 40000 to 59999
1.5.4 Pass #4: 60000 to 79999
1.5.5 Pass #5: 80000 to 99999
1.5.6 Pass #6: A0000 to ZZZZZ.
1.6 After you click on the “Submit” button at the bottom, a message will indicate that the request has been successfully submitted.
1.7 It may take up to an hour or more for the file to arrive in your Inbox. If it does not, check other folders. If you never receive it, you should try again or contact the ACBL.
1.8 Processing the file in the local system:
1.8.1 Save the attached file in the appropriate folder. The June 2018 file should be saved in …/D25/Database/Rosters/2018/June. Name the first file roster1.csv, the second roster2.csv, and so on.
1.8.2 Load DBD001A.php into a text editor. This step is only necessary for the first file.

1.8.2.1 Change the line that begins $File_Name= to specify the first file name.
1.8.2.2 Change the line that begins $YYYYMMDD= to the date that you received the file in the format YYYYMMDD. If the date was June 7, 2018, enter 20180607.
1.8.2.3 Save the changes.
1.8.2.4 Of course, it is not actually necessary to change the defaults for these two fields in the programs. Instead, the changes could be made when the program is run, in both the local and remote systems. However, it is very easy to make mistakes, and no one checks your work. Changing the defaults greatly increases the chances that the same specifications are used on both the local system and the remote system.
1.8.3 Start the BridgeDatabaseMenu.php program in your web browser. Make sure that you have the local system version, which will have a grey background for all programs.

1.8.4 Select the option to “Process a Roster File.”

1.8.5 Make sure that the file name and date are correct. Then click on the “Process File” Button displayed at the bottom. .
1.8.6 The program will take several minutes to run. If it stops immediately with an error, the most likely source of the problem is that the file name is wrong.
1.8.7 Keep this window open after the file has been successfully processed. A message will appear on the screen describing how many records were created or updated.
1.8.8 Follow exactly the same process for the second file with these exceptions:
1.8.8.1 Skip step 1.8.2.

1.8.8.2 In step 1.8.5 change the value of “Deactivate & Set Previous (1st File)?” to N before clicking on the “Process File” button.
1.8.9 For the third, fourth, and fifth files:
1.8.9.1 Skip step 1.8.2.
1.8.9.2 Leave all fields the same before clicking on the “Process File” button in step 5.1.7.3.
1.8.10 For the sixth file:
1.8.10.1 Skip step 1.8.2.

1.8.10.2 In step 1.8.5 change the value of “Update players_date_points (Last File)? ” to Y before clicking on the “Process File” button.
1.8.11 When the last file has been processed, check that the files look reasonable. Use the “Inquiry of ACBL Roster by Last Name” option on the “BridgeDatabaseMenu.php” program to check your own and a few other records.
1.9 After all six files have been processed and checked in the local system, you can process them in the remote system.
1,9,1 The process for transferring the source for the program and the data files is documented here.
1.9.2 In your browser run the BridgeDatabaseMenu.php program on the remote server. The background should be blue. If a tab on your browser contains a program on the local system, you should close it to avoid confustion.
1.9.2.1 Back up the players and players_date_points files and then run the “Process a Roster file” option six times as before.
1.9.2.2 The programs run much faster on the iPower server.
1.9.2.3 Very important note: iPower has a limit on the number of queries that can be run per hour. Experience shows that three files can be processed without exceeding the limit. So, after the third file has finished, make a note of the time. Postpone processing the fourth file for at least an hour.
1.10 The following fields are not updated by this program: oktoemail, email_rejected, familiar_name, deceased_YYYYMMDD, rank_YYYYMMDD, HBC, BoD, ExComm, joined_YYYYMMDD, DOB, county.
1.11 The email and email_YYYYMMDD fields are only updated if:
1.11.1 The current value of the email_source field is ACBL; and
1.11.2 The new value of the email field is not blank or Confidential@acbl.org.
2 Corrections:
2.1 If the program to update rosters dies in the middle,
2.1.1 If the “Deactivate & Set Previous (1st File)?” field was Y, the players and players_date_points files must be restored from the backup copies, and the process must be restarted.
2.1.2 Otherwise, the program can be rerun after the problem that caused the crash has been resolved.
2.2 If one or more field must be changed:
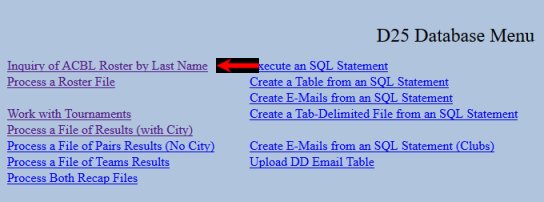
2.2.1 On the Database Menu in the remote system select the option “Inquiry of ACBL Roster by Last Name”.

2.2.2 On screen #BDB013A key in the player's last name and click on the “Select” button at the bottom. Pressing Enter has the same effect.

2.2.3 On screen #BDB013B click on the name of the player you wish to update and click on the “Edit Specifications” button. Double-clicking on the player's name has the same effect.
If no names appear, you entered a name that is not in the ACBL database. Either you misspelled the last name or left off "Jr" or "III" or some other suffix. Some people with three names combine the second and third as the last name. Click on the "Return" button and try again.
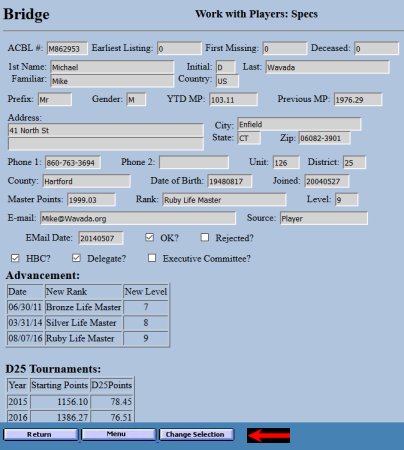
2.2.4 Screen #BDB013C is displayed. If the “Record” button is not visible at the bottom:
2.2.4.1 Click on the “Menu” button.
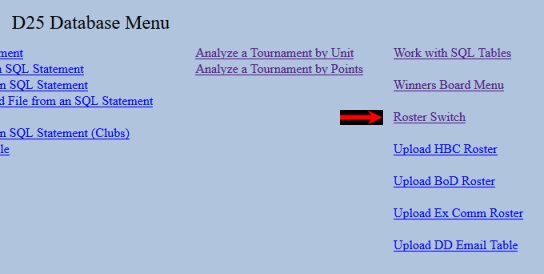
2.2.4.2 On the Database Menu select the “Roster Switch” option in the fourth column.
2.2.4.3 Repeat steps 2.2.1 through 2.2.3.
2.2.5 If the “Record” button is visible:
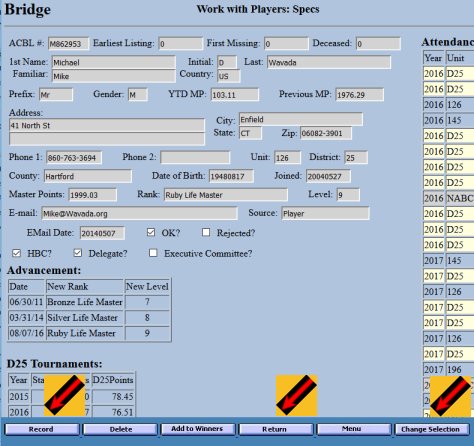
2.2.5.1 If the record displayed is not for the right person, click on the "Change Selection" or "Return" button.
2.2.5.2 Otherwise, change whatever fields are necessary.
2.2.5.2.1 Click on the “Record” button.
2.2.5.2.2 When the box that says “Data has been validated. OK to record?” appears, click on “OK”.
2.2.5.2.3 Important Note: It should seldom be necessary to change a record. Exceptions are when a player's familiar name is learned and when a player has unsubscribed, died, or provided a new email address. It should never be necessary to delete a player's record.
