

-
The ACBL has adopted a policy of sending a congratulatory email to each player who has advanced in rank. These emails were originally signed by the District Director, and the “from” address directed replies to the DD's email account. When the DD position was eliminated, the replies were directed to the Regional Director. It may be transferred to someone else at some point. In this section the person who receives the reply from the player is called the Reply Receiver, or RR for short.
-
The emails invite the recipient to reply with a description of their “bridge journey” and any comments or suggestions about things in the competitive bridge world.
-
The RR usually replies to some or all of the players and directs the most striking replies to the webmaster, usually as a cc on the reply to the player. The webmaster is expected to post the replies in the Feedback from Players area of NEBridge.org..
-
If the RR did not request a photo, the webmaster should send an email to the player, explain that his/her comments will be posted on NEBridge.org, and ask for a photo.
-
A new web page is needed for these entries every few months. Every page should have at least one or two entries. No more than ten or so should appear on one page. The instructions for creating and working on a new page can be found here.
-
Layout of the page:
-
The title of the page should be “Feedback from Players: Ppppp” where Ppppp is the period covered. So, for replies from players who advanced in February or March of 2022, the title should be “Feedback from Players: February-March 2022”. If you later decide to change the ending date, just edit the page.
-
The first paragraph describes what the feature is about. Copy the text from a previous period and make whatever changes are necessary.

-
Add a horizontal line below the paragraph.
-
A section for each player should also end with a horizontal line.
-
-
If a photo has been received:
-
Edit the photo as necessary. Tips for working with photos are posted here.
-
Save the photo in the Images folder on the local PC in the YYYY Documents folder, where YYYY is the year.
-
-
The sections for players.
-
Begin by pasting the text beneath the last horizontal line.
-
It will often improve readability to add line breaks by pressing the Enter key or remove them with the backspace or delete key.
-
Correct only horrendous mistakes. If in doubt, leave the text as written.
-
If you have a photo:

-
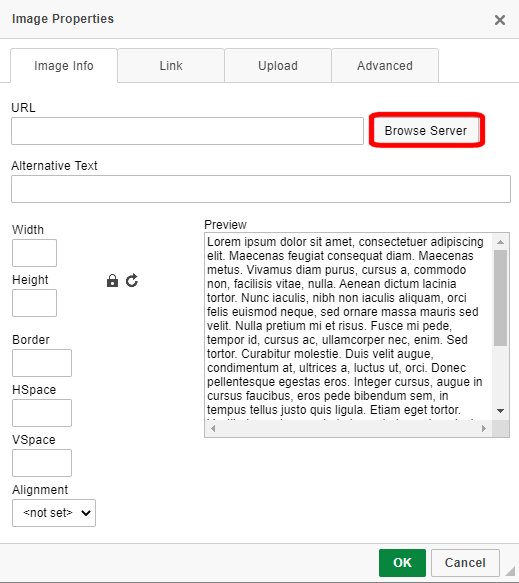
Place the cursor at the beginning of the first paragraph of the reply. Click on the Image button.
-
On the Image Properties window click on “Browse Server”.
-
Select the folder for Images within the YYYY Files folder on the File Manager window on NEBridge.org.

-
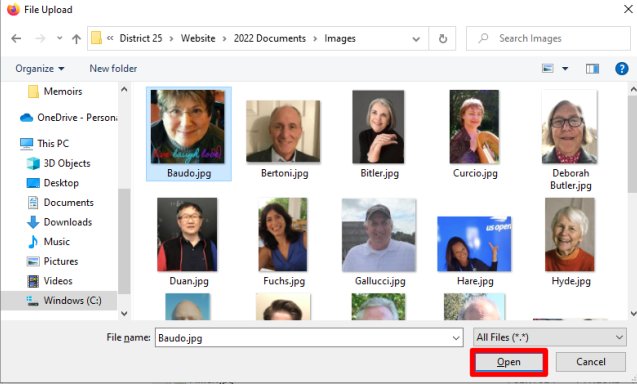
Click on “Choose File”.
-
Navigate to the folder in which you saved the photo, select the photo, and click on “Open” in the file selection window.

-
Click on “Upload” at the top of the File Manager window.

-
A small window will appear with a message that the file has been successfully uploaded. Close it. Then find the image that was just uploaded in the right side of the File Manager window. Right click on the file name and press “Select”.
-
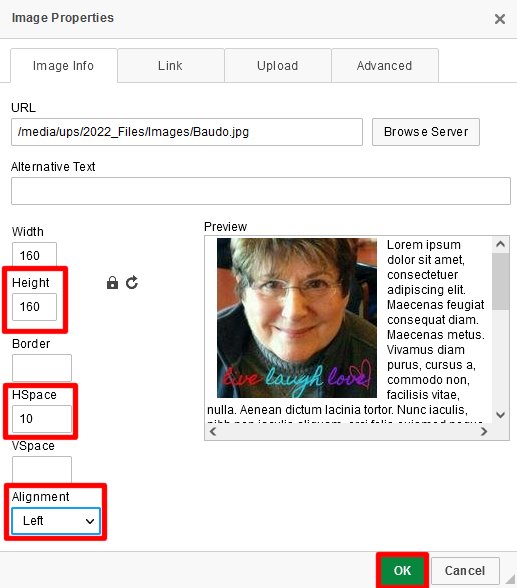
On the Image Properties window:
-
If necessary adjust the length of the image so that it fits within the section. The program will automatically adjust the width so the proportionality is maintained.
-
Enter 10 in the “HSpace” field.
-
Leave the values in “Border” and “VSpace” blank.
-
Set the “Alignment” field to Left or Right.
-
Click on OK.
-
-
The image should appear to the left or right of the first paragraph. If you do not like the size or placement, just click on the image, select “Image Properties”, and change the values that you don't like. Then click on OK as before.
-
More advanced techniques are discussed here.
-
-
Move the cursor back to the beginning of the section and add an anchor.

-
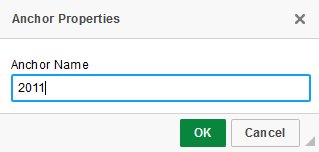
Click on the anchor icon, which for some reason looks like a flag. It is on the second line of the tools.
-
On the Anchor Properties window enter a memorable abbreviation of the player's name and then click on OK.
-
-
Record the following information on a sheet of paper or a computer file:
-
Player's name as it appears on the reply;
-
Player's city and state;
-
The month;
-
Player's new rank;
-
The name that you used for the anchor.
-
-
-
When the sections for each player have been completed:

-
Save the web page and make note of the page number. You can use either the icon in the first line of the editing tools or one of the buttons at the very bottom of the page.
-
To each player send an email with a link to the web page.
-
If an entry on the home page of NEBridge.org has already been written for the web page in step VIII, edit it as necessary.
-
Otherwise:
-
On the home page delete any existing entries for previous pages and add one with a link to the one created in step V.

-
In the Menus part of the admin section of NEBridge.select the “Most Recent” sub-tab of the “Players' Feedback” tab.

-
On the Change Menu Item screen Change the link to refer to the new page and click on Save.
-
On the Change Menu screen click on Save at the very bottom.
-
-
In the Pages part of the admin section of NEBridge.org use the information in step VII-F to add an entry for each player to the index page, which is #160.. Here is how to do each entry:
-
The entries are sorted by last name and then first name. If the player already has an entry:

-
Click on the “Source” button in the first line of the editing tools.
-
Use Ctrl F to search for the player's name.

-
Find the HTML code for the player's previous rank change. It will be a few lines below the name.
-
Add this code: <br />Mmmm YYYY<br />Nnnn Master, where Mmmm YYYY is the month and year and Nnnn Master is the new rank.
-
Click on the “Source” button and make sure that it looks right.
-
-
If the player does not have an entry:
-
Place the cursor at the beginning of the row just below where this entry will go. If the entry will go at the end of the list, put the cursor on the beginning of the last row.
-
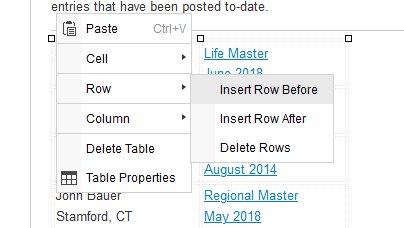
Right click and select “Row”. If the name goes below the selected location, select “Insert Row After”; otherwise select “Insert Row Before.”

-
Place the cursor in the first cell on the new row. Enter the first name, last name, city, a comma, and the state abbreviation in the first cell. Don't press Enter. It works best if the name and city are run together.
-
Place the cursor in the second column on the new row. Enter the new rank, month, year.. Don't press Enter. It works best if "Master" and the month are run together. Line breaks will be inserted in the next step..
-
Click on the “Source” button NS Use Ctrl F to search for the player's name as in steps.IX-E1a and IX-E1b above.

-
Add <br /> between the last name and the city and, a row below, between the year and the new rank.
-
Click on the “Source” button again. Check to see that the line breaks were inserted correctly. If not, click on "Source" again, find the entry again, and fix it.
-
-
Assign the link to the month and rank:
-
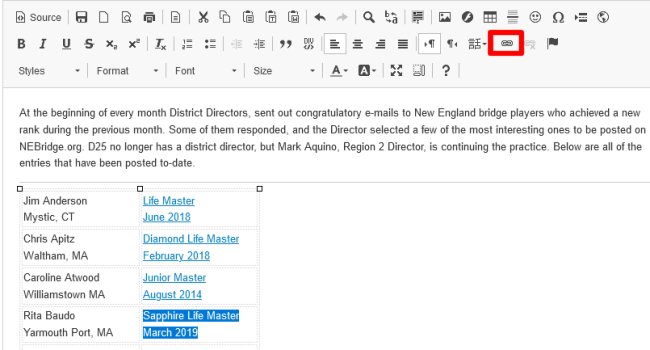
Select all the text in the second cell (month, year, and new rank) and in the second row of the tools click on the link button, which looks like (or at least is supposed to look like) two links of a chain.
-
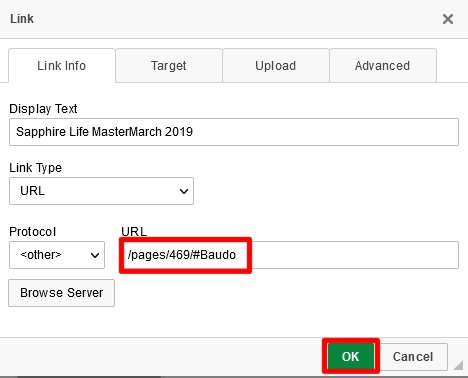
On the URL line on the Link window enter /pages/PPP#Aaa, where PPP is the page number you worked on in step 7, and Aaa is the anchor text. So if you used the anchor Baudo for the anchor for the entry on p. 469, you would key in /pages/#Baudo.
-
Click on OK.
-
-
When all entries have been made, click on “Save and continue editing” at the bottom of the editing page.
-
In a separate tab or browser session enter NEBridge.org/pages/160/ in the URL line. Make sure that all the new links work. If not, fix them in the editing screen.
-
-
-
Photos can easily be added later by placing the cursor before or after the anchor at the beginning of the player's section and following the instructions in steps VII and VIII-D.
