
1. After you have logged in to the Admin section of the www.NEBridge.org website, click on the word “Pages” (with white background) on the “Site administration” page. This starts the program used to add a new page or change the content of an existing page that is not a special one.
2. The list of pages already defined should appear.

A. To return to a previous screen, click on "Home" or "Pages" above “Select page to change" in the upper left corner.
B. To add a new page, click on the “Add page” button in the upper right corner.
C. To change the information for an existing page:
1) If you know the page number just add ppp/ (where ppp is the page number) to the end of the URL and press Enter
2) Otherwise, click on the Title on the appropriate line. There are two ways of finding an existing page:
a) If you know the title or part of the title, you can use the searching function (Ctrl F) in your browser. Hundreds of pages have already been created. Only the 100 most recently created ones will be visible.
 If you need to search on older pages, you must navigate to the bottom of the page and select a different set of pages. Then prsss Ctrl F again
b) If you know the date that the page was created, you can use one of the “Filter” functions in the upper right.
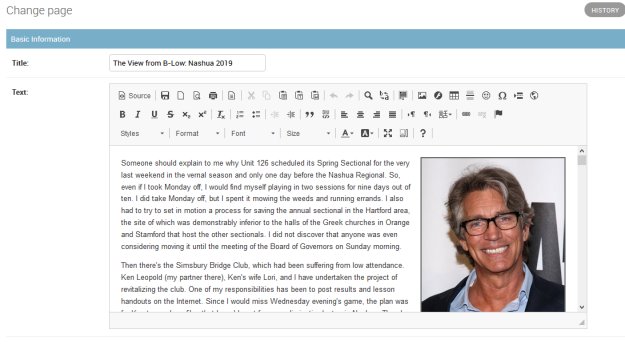
3. When you click on the “Add page” button or click on the Title of an existing page, a screen like the following appears:

A. The Title is the name of the page. It is displayed on the list of pages. It also is displayed (after the words “NEBridge – ”) at the top of the page when it is linked from the menu or another page.
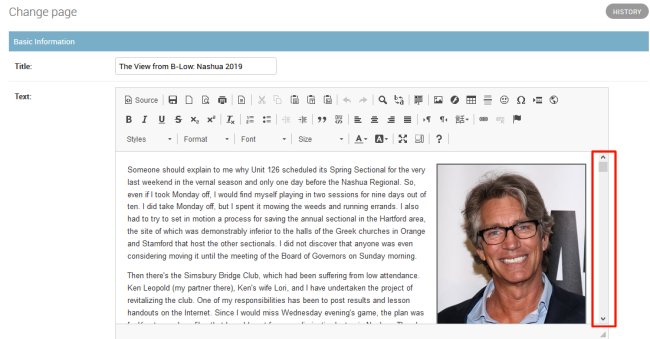
B. Most of the work is done in the Text field. Click on the slide bar to the right of the text (as opposed to the slide bar that is farther to the right). A screen with a wider work area such as the following will appear.
C. The Text field is used to provide the substance of the page. It is a hybrid of a WYSIWIG text field and HTML code. When you key in text, it is converted to HTML code. You can also edit the HTML code itself to fine-tune the appearance, but there are limits to this process, and usually it is easier just to let the program determine the HTML. This will be discussed in more detail in step XX.
D. The Text field is used to enter verbiage, define links to other pages, place image files, and create tables. It can also be used for formatting.
E. Dozens of buttons and a few pull-down menus are provided to make it easier to create an attractive web page. These features occupy the area above the work area. If you place the cursor over any button or pull-down menu, a short description of its function will appear.

1) The leftmost button has a piece of paper next to the word “Source.” Clicking on it produces a screen that allows you to edit the HTML code for the page. Most web pages do not require this, but for others the use is essential. Some of the uses of this feature are described here.

2) The button to the right of the Source button features a diskette. It is precisely equivalent to the Save button at the bottom of the page described below. You will be returned to the web page that allows you to select Pages to change.

3) The button to the right of the Save button features a page of text. It is used to start over with a blank page. This is almost never useful.

4) The button to the right of the New Page button has a magnifying glass. It is used to preview the page without saving it. The useful of this button is limted by the fact that it shows neither the banner at the top nor the Navbar menu on the left. Therefore, the spacing is often deceptive.

5) The next button, which looks vaguely like a printer, is for printing, which is almost never useful.

6) The next button is for selecting a template. The district does not use them.

7) Next are a set of cut and paste buttons.
a) The Cut button (scissors) and the Copy button (two pieces of paper) are only active when a section of text has been selected. You can also use Ctrl X to cut and Ctrl C to copy.
b) There are three buttons for pasting. For some reason none of them work. Just position the cursor where you wish to insert the text and press Ctrl V to paste in text that you have cut or copied from this page or anywhere else.

8) The next two buttons have curvy arrows on them. The one on the left undoes the last operation that was performed. Ctrl Z performs the same function. The one on the right cancels out the last undoing and restores the text to its status before the Undo button was pressed.

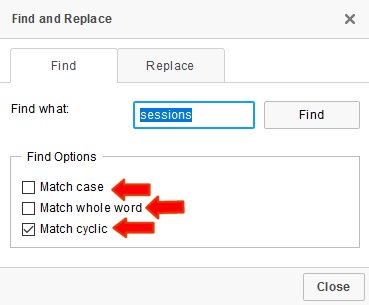
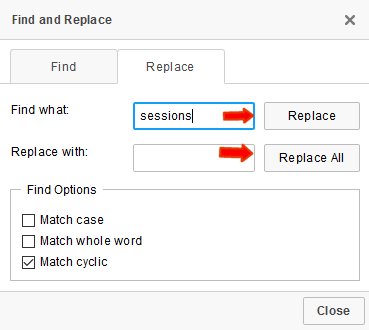
9) The next two buttons are Find (binoculars) and Replace (b, arrows and a). Clicking on one of them produces the Find/Replace window.

a) The Find Window has three fields: "Match Case" limits finds to exact matches with capitalization. "Match whole word" does not find words in which the text is only part of the word. "Match cyclic" goes back to the beginning of the text when it reaches the end.

b) The Replace Window has the same three fields for specifying which fields to replace as the Find Window. There are also separate buttons for replacing only the next instance or all instances.

10) Next is the Select All button, which selects all of the text in the work area. This might be useful if you want to work on the page in another editor and then paste the results back into the work area.

11) The next button, which contains a picture of a scene, is used for inserting an image. This process is described here.

12) The next button, which contains a white “f” on a dark circle is used for inserting a flash file. This process is essentially the same as for inserting an image.

13) The next button is for creating a table. Working with tables is described here.

14) The next button inserts a horizontal line into the text by using the HTML tag <HR />.

15) The next button, which is round with a smiling face, is for inserting an emoticon into the text. A window with pictures of the available emoticons is displayed for your selection.

16) The next button looks like a capital omega (Ω). It is used for special characters. A window with the available characters is displayed for your selection. Other characters can be introduced using the Source button, which is described here.

17) The next-to-last button, which looks like two pieces of paper with a space between them is used for inserting a page break for printing.

18) The last button on the first line can be used to insert an IFrame. It is not used by District 25.

19) You must select a portion of the text before you click on any of the first four buttons on the second line. They are used respectively for bolding (Ctrl B performs the same function), italicizing (Ctrl I), underlining (Ctrl U), and striking through the selected text.

20) You must select a portion of the text before you click on either the subscript or superscript button. With some fonts these buttons may not produce the effect that you expect. It may appear one way in the text editor and a different way when the page is saved. This is evidently caused by a Cascading Stylesheet that applies to all NEBridge pages, but not the editor.

21) You must select a portion of the text before you click on the Remove Format button. It removes all formatting (color, stroke-weight, etc.) for the selected text.

22) You must select a portion of the text before you click on either of the list buttons. The one on the left creates or removes a numbered list. The one on the right creates or removes a bulleted list. Warning: These two buttons do not work correctly. The text will look correct in the editor, but the actual page is wrong. This is evidently caused by a Cascading Stylesheet that applies to all NEBridge pages, but not the editor. It is possible to fix them by adding style entries. See page #470 for an example of a multi-tiered numbered list that uses <OL>.

23) You must select a portion of the text before you click on either of the indenting buttons. The one on the left decreases the indent. The one on the right increases it.

24) The button that looks like a double quotation mark makes a block quote out of the selected text. Warning: This button does not work correctly. The text will look correct in the editor, but the actual page is wrong. This is evidently caused by a Cascading Stylesheet that applies to all NEBridge pages, but not the editor.

25) The next button is used to create a Div container. It will seldom be necessary to use it.

26) The next four buttons are used to justify one or more selected paragraphs. From left to right they are left-justify, center, right-justify, and block-justify.

27) The next two buttons determine whether the text goes left-to-right or right-to-left. The first one should always be depressed.

28) The next button is for setting the language. It will be useful if Sharia Law is ever imposed.

29) The last three buttons on line two are for linking.
a) The Link button, which is supposed to resemble two links of a chain, allows you to associate a selection of text or an image with the URL of a website or with an anchor on the current web page. This process, as well as the process of uploading files to NEBridge.org so that they can be linked, is described in detail here. Note: the Link button can only be used with files (URL's), email addrsses, and anchors.
b) The Unlink button removes the link for selected text.
c) The Anchor button, which for some reason looks like a flag, allows you to put in named “anchors.” After the named anchor has been created, you can link to that position in the text. These are used extemsively in the Winners Boards and Feedback from Players. This process is described here.
30) Pull-down menus:

a) A few styles have been defined and can be listed by clicking on the arrowhead next to Styles. You can select some text and then apply one of the styles to it. You may want to experiment with these.

b) A few formats have been defined and can be listed by clicking on the arrowhead next to Formats. You can select some text and then apply one of the formats to it. You may want to experiment with these. This works exactly the same way as the Styles menu.

c) You can change the font and size of some selected text by using the Fonts menu and the Size menu.

d) The color of selected text and the background color can be changed using the next two menus, which look like an A underlined in red and a yellow pencil. In both cases a palette is displayed. If you want to use a color that is not on the palette, you must use the Source button.

31) The last three items are buttons of limited utility.
a) The first one toggles between full-screen mode and window mode.
b) The second one toggles between showing “blocks” (where paragraphs and other formatting devices begin and end) and the WYSIWIG format shown above.
c) The last button describes the release of the editing software that has been installed.
4. There are some useful combinations of keys: Ctrl B sets the selected text to Bold. Ctrl I italicizes the selected text. Ctrl U underlines the selected text. Ctrl F can be used to find a word or phrase. Ctrl L shows the Link screen for the selected text. There may be others.
5. To reach the rest of the screen you can use the slidebar or press Page Down or the downward-pointing arrow..

A. You only need to change the fields on the bottom half of the screen when you are saving a page for the first time. The easiest approach is to leave the Owner as it is and to click on the "Today" and "Now" buttons. When everything seems OK, click on one of the “Save” buttons in the lower right corner.
1) Use the “Save and add another” button to save the page and then immediately create another new page. This is useful when creating a series of small pages or placeholders.
2) Use the “Save and continue editing” button to save the page so that you can view it in another browser session or tab. This is useful if you are not certain that the contents are completely correct.
3) Use the “Save” button to when you are satisfied with the page’s content and appearance. You will be returned to the web page that allows you to select pages to change.
B. You can remove a page from the system by clicking on the red text “X Delete” in the lower left corner. However, you should only do this if the page was entered in error, and no links to that page exist anywhere. Deletion cannot be undone.

