

1. The files that are stored on the www.NEBridge.org website can only be accessed through one of three buttons that are available when working on Pages: Link, Image, or Flash. You cannot work on files except in that context. This document describes the process of establishing a link between one or more text fields in a document and files that need to be uploaded from the user’s local system to NEBridge.org. The text will then be displayed in blue and underlined. When the user clicks on it, the current page will be replaced by the file that has been linked to the text.
2. The files can be any type of file that the browser can identify by its suffix and processed as a web page: text, pdf, HTML, etc. Important note: The names of the files cannot be changed as part of the uploading process. The file on the website’s server will automatically have the same name as on the local system. If the (fully qualified) name has already been used on the website’s server, the upload program will append a number to the end of the name of the newly uploaded file and will not issue a warning that it did so. It makes sense to name the files on the local server so that this never happens. That is, it is good practice never to use a (fully qualified) file name on the local system that has already been used on the website’s server. This approach helps ensure that what appears on the website is the same as what was on the local server.
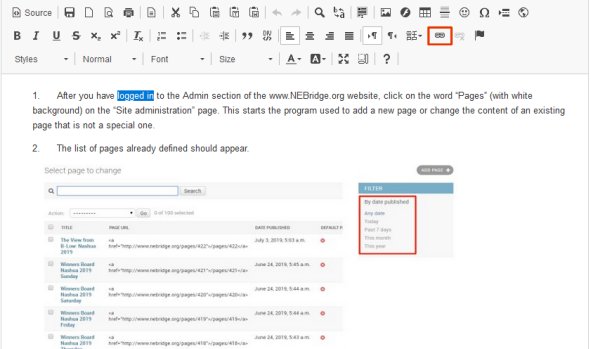
3. Establishing links between text or objects and files:
A. Log in to the admin section of the website.
B. Select the Page that you want to work on.

C. On the Change page screen select the first set of text or the image that should be linked to one of the files. The text can be inside of a table. Then click on the Link button, which looks like two intact links of a chain. The following window will appear:
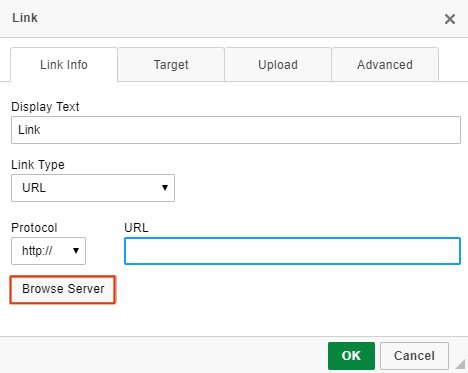
D. Click on the “Browse Server” button in the “Link Info” tab. When you do, a new webpage in a separate instance of your browser will open. It might take a minute or two to appear. When it does, you will see a list of the files and folders in the root directory of the www.NEBridge.org website.
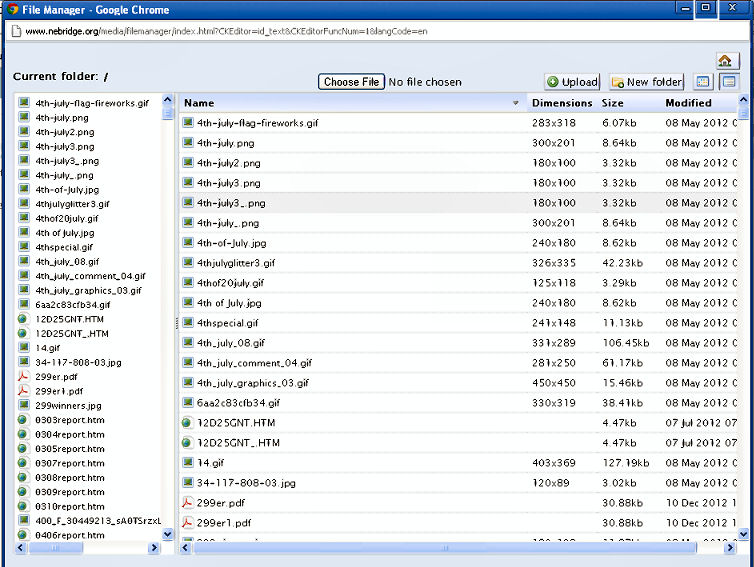
E. Note that this webpage has two frames. The one on the left is used for selecting. The one on the right shows the contents of the current folder, i.e. the one selected. In the example shown above no folder has yet been selected, so the contents of the root folder is displayed in both frames.
F. Each frame should have a slidebar. If the slidebar for the frame on the right is not visible, maximize the size of the window by clicking on the white square in the upper right corner. This should make both slidebars visible to you.
G. Layout of the files:
1) All files should be in folders. Never upload anything to the root directory. This rule was violated repeatedly for several years, but there is no excuse for adding to the mess.
2) At a minimum the following folders should be created in the root directory:
a) One to hold calendar information (flyers and ads) for each year. In 2019 this folder is called "2019_Calendar."
b) One to hold the other documents received from outside sources for each year. In 2019 that folder is called "2019_Files."
c) Documentation for all activities of the Communications Committee is in the folder named "Documentation."
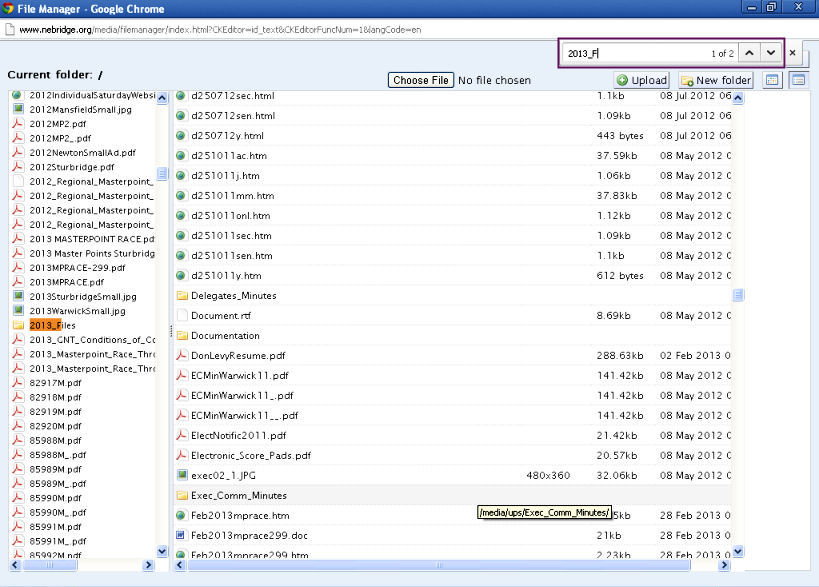
3) Each folder can have sub-folders, which in turn can have sub-folders without limit. You must find the folder using the slidebar or the browser’s find tool (Ctrl F). You need to locate it in the left frame. The image above depicts a search for “2013_Fi” in a Google Chrome browser. When you click on the name of the folder in the left frame, the contents will appear in the right frame.
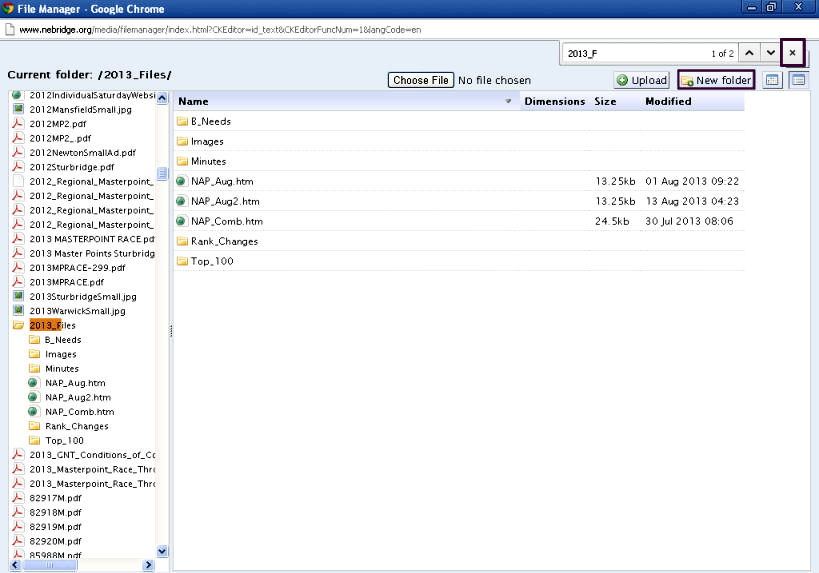
4) If you need to create a new folder, click on the “New folder” button in the upper right. Important note: If you cannot see this button, you may need to close the browser’s little window used for finding by clicking on the X.

a) A window will appear to enable you to key in the name of the folder and then click on the “Create Folder” button.
b) The folder will then appear in the current folder. You can select it by clicking on the name in the left frame.
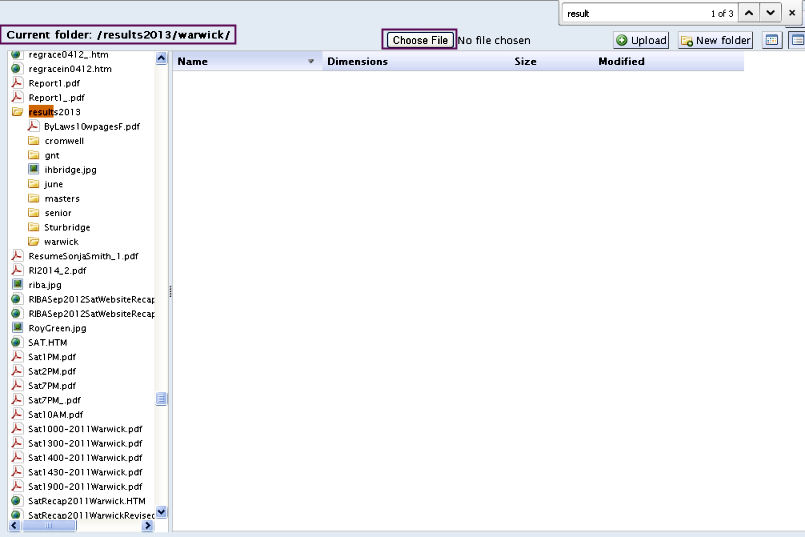
H. When you have selected the folder into which you wish to upload the files, check to make sure that the “Current folder” displayed in the upper left is the one that you want and then click on the “Choose file” button. A window similar to the following will appear.
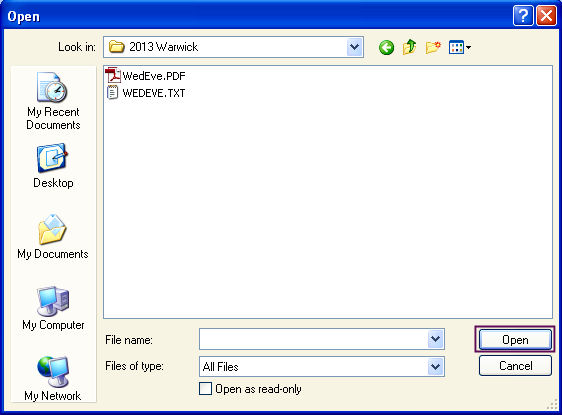
I. These are files on your local computer. You must find the files that you wish to upload. It is therefore important that the files on your local computer be stored in a way that makes them easy to find. Click on the file that you want and then click on the “Open” button. Only one file may be selected at a time.
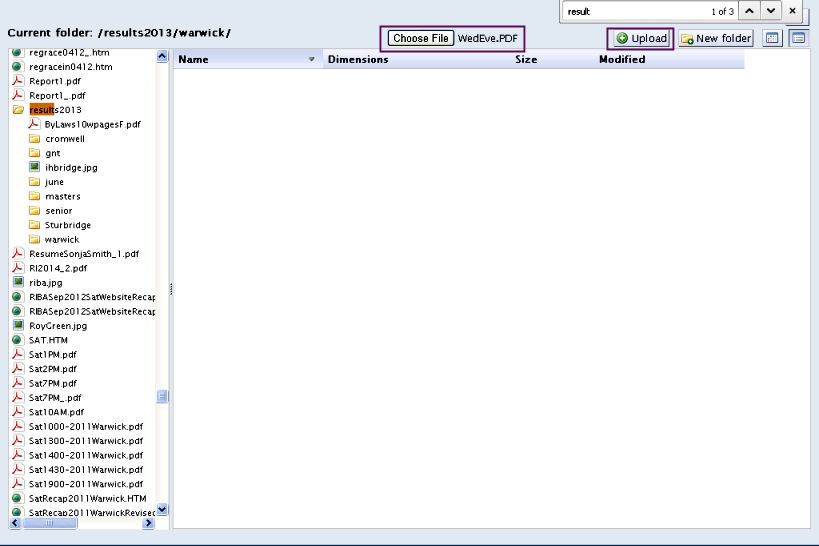
J. Check that the file name next to the “Choose File” button is correct. Then click on the “Upload” button. It may take a few minutes if the file is large, but eventually a window should appear to inform you that the upload was successful.
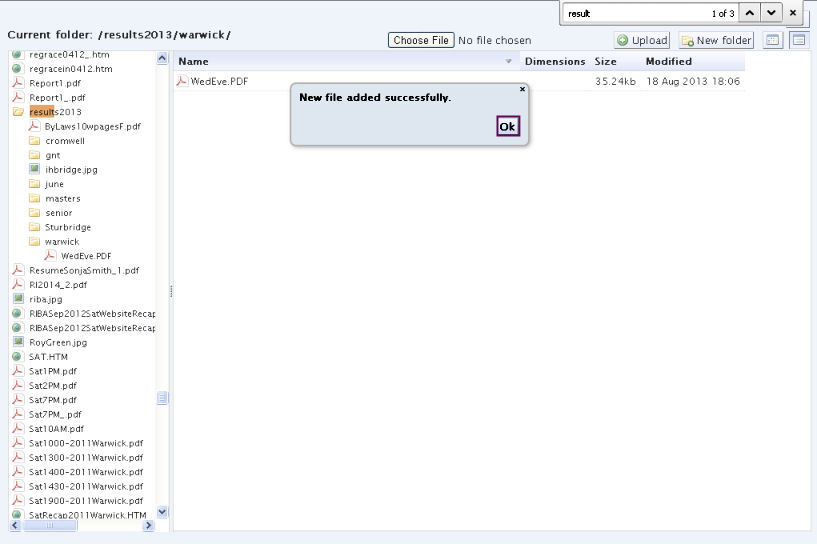
K. Click on the “Ok” button to make the little box disappear. If you have more files that you wish to upload, it will save time to repeat steps H through J for those files before proceeding to the next step.
L. Then click on the name of the file in either frame. This screen should appear.
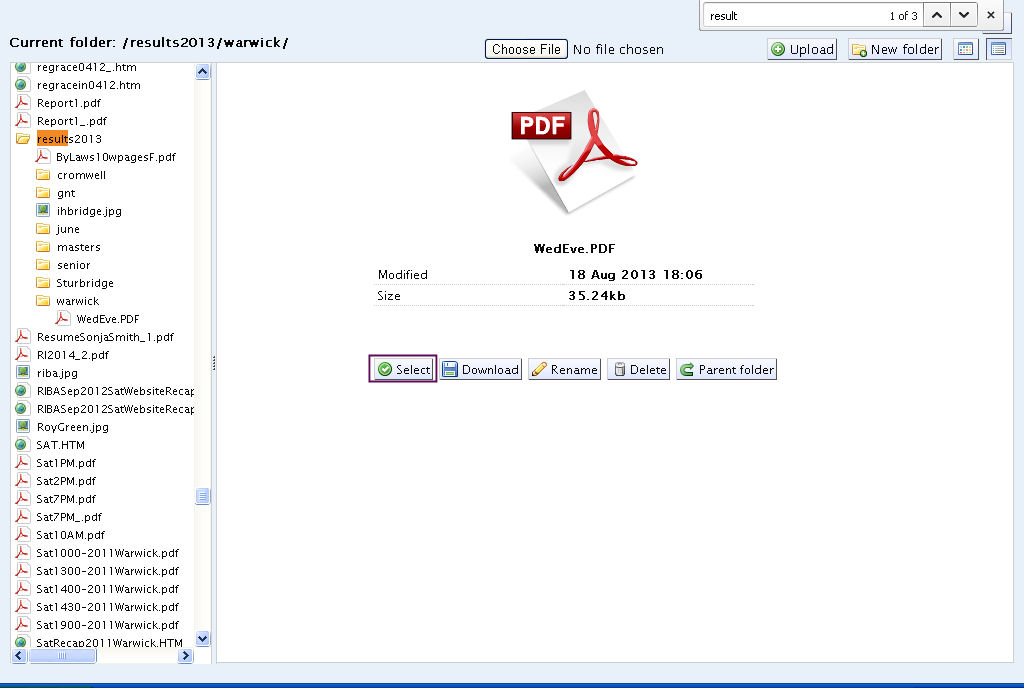
M. Click on the file that you want to link to the text or image that you selected in step C. The right frame will be replaced with something that looks like the above. When you click on the “Select” button, the following will happen:
1) The instance of the browser that you have been working on above will disappear.
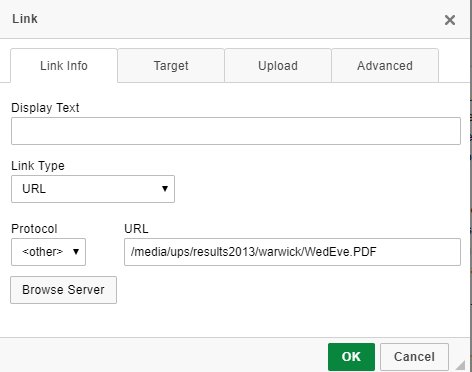
2) The other instance of the browser with the “Change page” webpage and the Link window will be displayed. However, the URL of the file will be displayed in the URL window.
a) If you only uploaded one file, just click on the “OK” button. The text or image will be linked to the file as soon as you save the page.
b) If you uploaded more than one file, you can save a good deal of time by using the following trick:
(1) Select the text that is now displayed in the URL field. Then press Ctrl C to copy it into the clipboard.
(2) Click on the “OK” button. The text or image will be linked to the file as soon as you save the page.
(3) To link the other files:
(a) Select the text or image from the document that you want to link.
(b) Click on the Link button as in step three.
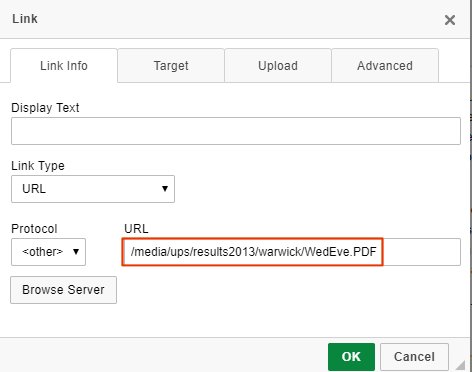
(c) When the Link window appears, do not click on the “Browse Server” button. Instead, position the cursor in the URL field and use Ctrl V to paste the URL from the first file.
(d) Leave the folder path as it is displayed, but change the file name to the second one that you previously uploaded. Important Note: The file name that you key in must precisely match the name of the one that you uploaded.
(e) Click on the “OK” button. The text or image will be linked to the file as soon as you save the page.
(f) Repeat for all of the other files to be linked.
4. The instructions in this section focus on how to upload images using the Image button, but the process for uploading flash files using the Flash button is essentially the same.
A. Log in to the admin section of the website.
B. Select the Page that you want to work on.
C. On the “Change page” screen position the cursor where you want the image to appear.

D. Click on the Image button. The following window will appear.
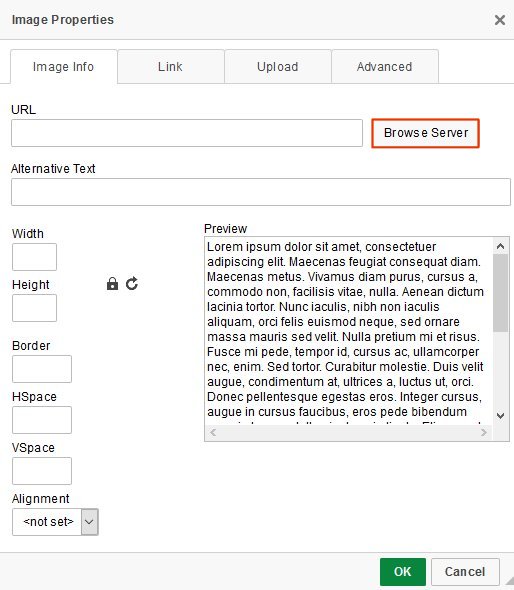
E. Click on the “Browse Server” button. The process for selecting the file is the same as the one described above for linking text with a file.
1) When the file has been uploaded and selected:
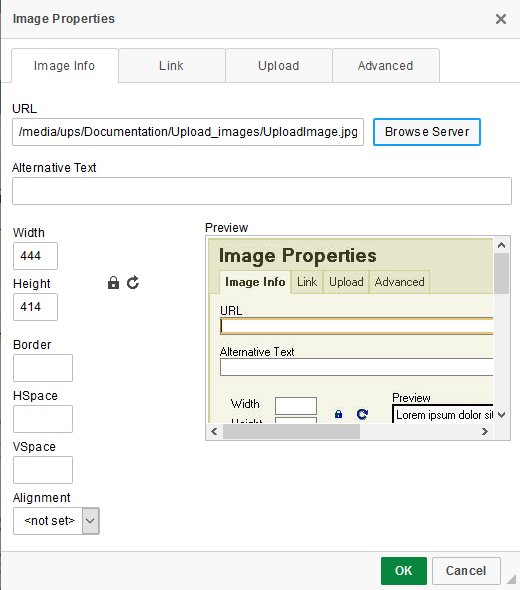
a) The image will appear in the Preview box
b) The name will appear in the URL field.
c) The size (in pixels) will automatically appear in the Width and Height fields.
2) You can change the size by changing the Width field. The Height will automatically be adjusted if you make it blank. This may be necessary because images that are larger than 700px will extend past the area provided. You can also leave the Width blank and specify the Height.
3) You can specify a border size, horizontal spacing, and vertical spacing in the Border, HSpace, and VSpace fields. All of these entries are in pixels.
4) The pull-down menu at the Align field allows you to specify that the image is aligned to the right or left. If you leave this blank, the image will take up the entire column, and it will be centered.
F. If you want to link the image to a file, you can do that by clicking on the Link tab. The process is the same as is described in item 4.
G. When everything appears OK, click on the OK button. The image will appear in the work area at the position of the cursor.
H. Note about files uploaded from Microsoft Word: placeholders for the images will be imported with the text, but the files must be uploaded to www.NEBridge.org and associated with the images by means of the Image button. Be careful with the height and width of these images; the size will be inherited from the Word documents even if the actual file has different dimensions.
5. It is possible to link to a position of a webpage other than the top, including the current webpage. A frequent use of this feature is to provide a table of contents for a webpage.

A. The first step is to mark the positions using an Anchor tag. Position the cursor in the WYSIWIG window and click on the Anchor button. The Anchor Properties window will appear.
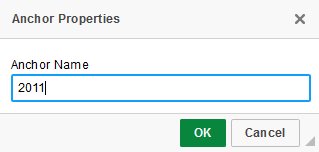
B. Enter the name that you wish to associate with this position in the document and click on the OK button.
C. Move to the position in the text from which you would like to link to the new anchor and select that text.

D. Click on the Link button. When the Link window appears, select “Link to anchor in the text” from the Link Type pull-down menu.
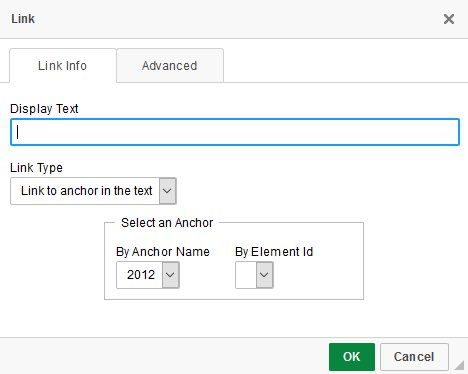
E. Select your anchor from the pull-down menu in the “Select an Anchor by Anchor Name” field and click on OK. The link has been established.
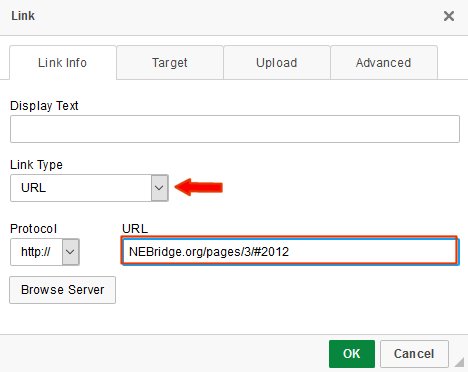
F. To link to an anchor on a different webpage, simply specify the link type of URL and add a pound sign and the name of the anchor to the URL for the page. For example, the anchor in the above example is on the web page named nebridge.org/pages/3/. If you wanted to link to the 2012 anchor on this page from text on a different page, you would key in nebridge.org/pages/3/#2012 at the URL field.
